Patriotic DuckThe All American RunnerDuck Review
July 6, 2008
 Welcome Back
 

Welcome Back: 

Happy 4th of July! June just sort of blew by. The island activities have ramped up and there is something going on all the time. Car shows, art fairs, farmers markets, carnivals, something for everyone. Ken's brother Ron (www.walkingfortbragg.com) and his wife Lolli drove up from California for a visit. He gets pretty good mileage with the Flintstone Mobile :-)

 
 Flintstone Park in Oak Harbor, Washington
 
We had a good time just rattling around the scenic spots of the island. This picture of Ron was take at Flintstone Park in Oak Harbor.
 
We ended up having the coldest spring in history but toward the end of June things started to get more summer like. Here in Coupeville, Washington we are supposed to get around 18" of rain a year but we think we are well ahead of that mark.
 
Since summer is a wonderful time in Washington , especially on the many islands we have, we encourage you to come visit and see what we have to offer. Whidbey Island is just the beginning of the beautiful San Juan Islands. If you want to see some of the most beautiful islands in the world come check us out, you won't be disappointed. There are many beautiful cabins, lodges, and bed and breakfasts on the islands in which to stay.

Ken and Marilyn
Wood'n Wares
 
WoodnWaresLogo

Wood'n Wares Maple Spoons

Our friends Bob and Jean who make these wonderful wooden kitchen utensils in their little wood shop in Montana are really busy with craft fairs and markets this time of year.  Get your order in now before supplies dwindle. Most items ship within a day or two but if Bob is out of something it can take a week or more to get your order. Order now and beat the rush!

Check out all the great kitchen tools by going to, www.runnerduck.com/woodnwares.htm

Join Our Mailing List!
In This Issue
What's New
Site of the Month
Marilyn's Corner
The Tempos Big Band
Joke of the Month
This Months Recipe
Cookbook of the Month
Woodworking Project
Free Rockler Catalog
Please Donate
 
 
Wood Plans
Woodworking Tools
Rockler Father's Day Special
Just click on the picture below for some great Father's Day savings from Rockler.

JessEm Mast-R-Lift with Porter Cable 75182 Motor - Special Limited Time Offer!

What's New?
Once again we are battling the raccoons that are attacking our fishpond. They had backed off for a while but now they are back and tearing things up. They not only try go get in the pond to eat the fish but they tear the plants out of pots and generally destroy things. What's up with that?
 
We have a plan though, we've had a live trap out for the past week with no luck so we are now going to install an electric fence around the pond. We did that at the last place we lived and it seemed to do the trick. We can only hope that it works as well here.
 
To try and make it look nice we are going to use bamboo to hold up the wires. We'll try to get a picture of it in next month's newsletter.
Site Of The Month
We stumbled onto a very interesting web site that has some very interesting information. For a real eye opener as to how fast the population is growing, or how much fuel is being produced or how fast different diseases are growing and much much more, check out http://www.poodwaddle.com/clocks.htm.
 
There is a scroll bar at the top of the page where you can select many different types of clocks. They have a world clock, crime clock, earth clock, how old you are, time zones, world population, future population, you get the idea. Some of the numbers will astound you, they sure did us.
 
While you are at poodwaddle.com check out their home page. You can make it your home page and customize it any way you want. You can add things to it like a calculator, calendar or note pad, and many more. We've found it to be quite handy assigning frequently used web pages to buttons that we place on the page.
 
We hope you find this site as interesting and usable as we have.
Marilyn's Corner

Bubble Maker 
 
The weather is getting hot and what a great time to make bubbles, I mean BIG bubbles. This is a pretty simple project that will provide hours of fun and really impress your friends. Here's what you'll need:
 
  • 1 Wire Coat Hanger
  • Some scrap cloth like an old T-shirt or some thin cotton.
  • Some tape, duck tape works really good but most any waterproof tape will do.
  • A large shallow pan either round or square.
  • Bend the coat hanger to fit into the pan.


    Wrap the coat hanger with the cloth. Tape it at the beginning and end with the tape.


    Mix the following ingredients to make the bubble solution. Believe me this is a pretty strange mix but it works really good. You can try different things but we know that this works.

    • 1/2 Cup Dawn Dish Soap. Others will work but this works best.
    • 5 Tablespoons Glycerin
    • 4 Tablespoons Salad Oil
    • 2 Tablespoons Vodka. I have no idea what this does but seems to help.
    • 5 Cups Water


    Pour this mixture into your pan, dip your wand into it and wave it in the air. You should get lots of big bubbles that last a long time.

    Remember we have all of our past projects archived on our web site at www.runnerduck.com. Just click on the Craft Egg.

    The Tempos Big Swing Band
    The Tempos are into their summer concert season. If you are interested in seeing and hearing The Tempos keep an eye on this column for performance dates.
    Right now they are scheduled to perform at the Bothell Landing in Bothell, Washington Friday July 18th at 5:30 and at the Ballard Locks in Ballard, Washington Sunday August 17th at 2:00.

    The Tempos
    News and CD of the Week

    "Big Swing" features fourteen great swing songs from the 40's and 50's. If you love the old big band swing music we think you'll enjoy this CD. It's the kind of music that makes you just want to get up and dance, you do remember how to swing don't you?

    The only place you can get this CD is from our web site. Go to www.thetempos.com and click on the "Click Here" at the top of the web page or click the album cover.


    CLICK HERE
    .

    If you'd like to get a taste of this CD just go to The Tempos web site. When you are at the Tempos web site click on the horn valve button that says "Hear our CD". Then click on the song titles to hear a little bit of each song.

    The Tempos big swing band is available for hire. If you have a special event that could use the wonderful music of a classic sixteen piece big band be sure to contact kennyb@runnerduck.com. We perform all over the Seattle area for all sorts of events.

    Joke of the Month

    This months joke came from M. Taylor. Thanks for the laugh!

     
    Government Contracts......

    Three contractors are bidding to fix a broken fence at the White House in D.C.; one from New Jersey, another from Tennessee and the third, from Florida. They go with a White House official to examine the fence.

    The Florida contractor takes out a tape measure and does some measuring, then works some figures with a pencil. "Well", he says, "I figure the job will run about $900: $400 for materials, $400 for my crew and $100 profit for me."

    The Tennessee contractor also does some measuring and figuring, then says, "I can do this job for $700: $300 for materials, $300 for my crew and $100 profit for me."

    The New Jersey contractor doesn't measure or figure, but leans over to the White House official and whispers, "$2,700."

    The official, incredulous, says, "You didn't even measure like the other guys! How did you come up with such a high figure?"

    The New Jersey contractor whispers back, "$1000 for me, $1000 for you, and we hire the guy from Tennessee to fix the fence."

    "Done!" replies the government official.

    And that friends, is how it all works!

    This Month's Free Recipe
     
    Rhubarb Cake 
     
    Rhubarb is in season and it's time to do something good with it. You either love rhubarb or hate it but this rhubarb recipe might just turn the table on your taste buds. Ken really likes it but then he loves rhubarb!
    • 5 Cups Rhubarb, cut up
    • 1 Cup Sugar
    • 1 3 ounce package Strawberry Jell-O
    • 3 Cups Mini Marshmallows
    • 1 Package Yellow or White Cake Mix
    Put the Rhubarb in the bottom of a 9" X 13" pan.
    Sprinkle with Sugar.
    Sprinkle with Jell-O.
    Cover with Marshmallows.
    Mix the cake mix per directions and pour over the marshmallows.
    Bake at 350 degrees for 35 to 40 minutes. Ken likes it served cold with a big scoop of home made vanilla ice cream, yum!

    Every month we post a new recipe on our web page. Be sure and check out the New recipe at the
    RunnerDuck Kitchen Store.
    Cookbook of the Month
     "Life's Little Rhubarb Cookbook: 101 Rhubarb Recipes"
    by Joan Bestwick


    (CLICK)
     
    "Rhubarb, rhubarb, rhubarb" was what crowds in a Hollywood movie muttered when stewing about something. Life's Little Rhubarb Cookbook will make you want to stew, too and cook up rhubarb in dozens of other ways, as well. Besides offering recipes for pies and a host of other old-fashioned desserts, Joan Bestwick shows how to serve rhubarb from breakfast to dinner before dessert. She offers cinnamony muffins with a dollop of peach and rhubarb filling in the center, easy Rhubarb Chutney to serve with cottage cheese at lunch, refreshing Rhubarb and Lemon Punch sweetened with pineapple juice, and for a midafternoon treat, a "pizza" of rhubarb puree on a flattened pie crust dotted with strawberry "pepperoni," dried black cherry "olives," and a shower of grated white chocolate "cheese."
    Woodworking Project
     

    WOOD PROJECT PLANS

    DOWNLOADABLE & MAIL-DIRECT
    WOODWORKING PLANS
    Download WOOD Store® woodworking plans directly to your computer and start building in just minutes! OR, we'll mail them to you, your choice!

    CLICK!

    This Months Woodworking Project

    Screen Door

     
    I got a little side tracked this month with the raccoon fence project so I didn't quite get my new screen door done. I did get far enough along to show you how to build one. The only things I didn't get done were attaching the screen and finishing the varnish.
     
    We have been wanting a screen door on our front door for some time now but coming up with the right design took a while. We wanted a screen door that was more like the ones we remembered when growing up rather than some plastic or metal manufactured door. We definitely wanted it to be able to slam and hopefully squeak. We didn't want any fancy closers but instead just an old fashion spring.

    I went to the lumber store to get the wood for my screen door and the guy at the yard asked what I was building. I told him a screen door and he said, "We have a screen door kit for only $154." I said, "No thank you it will be more fun to design and build my own."

    The first thing you'll need to know is the size of your screen door. Mine turned out to be 3'0" X 6'0". You'll also have to decide on a design. You can copy ours or come up with your own.

    Here's what you'll need:

     
    *  5/4" X 6" lumber. I used clear, straight grain fir. Choose a good stable wood that won't warp in the weather.
    *  3/8" or 1/2" oak or walnut dowel.
    *  Screen material to cover the openings. I used good old metal screen, trying to keep the old fashion effect.
    *  (2) 3" X 1" hinges, I used brass. A screen door spring or closer if you are so inclined.
    *  A handle and latch. Again I opted for just an old fashioned handle and for the latch I used a hook and eye.
    *  (80) #6 X 1" brass screws.

    I made the side and center stile's 4 1/2" wide and the top, center and bottom rail's 5 1/4" wide.
    You can adjust the dimensions to fit your door.


    Opening Dimensions

    Once you have all your dimensions figured out it's time to start making sawdust. It's important to size your wood so that everything matches up when you assemble it. I used my planer to get all the wood to the same thickness.


    These little 13" planners work great!

    It's a good idea to run the edges of the boards over a jointer to true them up. If like me you don't have a jointer I've found that the Frued Glue Line Rip blade is a close second.

    The real work in making this door is the tenon and mortise joints. If you are very careful in your layout and measuring everything will come together perfectly in the end.
    Start out by making the tenon's. I made the tenon's on the top, center and bottom rail's 4" X 2" X 1/2", the tenon's for the center stile are 3 1/2" x 2" X 1/2".
    The way I set the height for the tenon shoulders is using a height gage attached to my combination square.

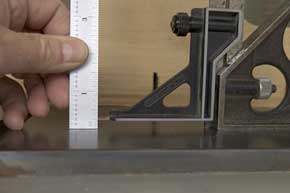
    Then I transfer that dimension to my saw blade.

    Notice that I'm using the table saw sled that we built from my Table Saw Sled project.
    To make sure that every shoulder is exact clamp a block to the tablesaw sled.

    Next you'll want to cut the cheeks of the tenon's. I like using my Heavy Duty Tenoning Jig.

    I can use it for the narrow side of the cheeks but I needed to add a support board to my tablesaw miter for cutting the wide cheeks.

    Again I attached a stop block to get them all exact.
    Next it was on to the mortise's. I found the center of each mortise and then marked the ends using my cool Incra Precision Centering Tool.

    I placed the center of the rule over my mark and then marked each end of the mortise. I continued the line using a small square.
    Then I marked the center line of the mortise using my Incra Precision T-rule. These are very cool for this application.

    I just place my pencil in a hole on the rule that lines up with my center and then drag the square bar along the edge of the wood. It makes a nice centerline to follow when drilling out the mortise's.
    Now drill out the mortise using a 1/2" forstner bit 2 1/16" deep, following the centerline. Be sure to start and stop at the ends without going over the line.

    Clean out the mortise's using a sharp chisel.

    Do a dry fit with all the pieces before you drill the holes for the pegs or do any gluing.

    Mark the width of the pegs, 3/4" in from each side, on the tenon and transfer them to the mortise.

    Measure 1" in from the edge to the mark and using a forstner bit that matches your dowel, drill through the front of the door and half way through the back of the door.

    Clean out the mortise to make sure that any tear out from the drill is cleaned up.
    Put the door together and square it up by measuring from corner to corner and then the opposite corners. They should be the exact same measurement. If not "tweak" to door into square.
    Using the same forstner bit that you drilled the peg holes with, mark the center of each hole on the tenon.

    To make a draw fit joint, where the pegs will actually pull the door together tightly, mark the hole centers 1/32" inside the point marks from the forstner bit.

    Be very accurate when you drill these holes. On wood like fir there is a tendency for the drill bit to drift off the hard part of the grain. Hold the wood tight and use a drill press.

    Cut 1" pegs from dowel and round over the end that will be driven into the peg holes.
    Before you glue up your door it's a good idea to sand all the pieces first.
    Now it's time to glue everything together. You'll need to work fast depending on the type of glue you use. Try to use the slowest drying glue you can find such as Titebond II Extend Wood Glue, it has a fifteen minute working time.

    Check for square and clamp the door using bar clamps or pipe clamps.
    Apply glue and drive the pegs in using a dead blow mallet.
    Once the glue is dry flush cut the pegs using a good flush cut saw.

    Sand smooth along with the rest of the door.
    I set the door into the molding of our front door and found that the moulding was askew a little bit so I had to trim it to fit exactly. I used my metal edge but you can use a straight piece of lumber and a skill saw.

    Install the hinges in the molding and in the door. Check the fit one more time.
    I made the molding to go over the screen using the left over pieces from trimming the door stiles.
    They are 1" X 1/4". I cut a 1/16" dado in them using my table saw and fence.

    Next I rounded over the outside edge using a 1/4" round over bit in my router.

    I used a fence since the wood was too thin to run along the ball bearing of the router bit.
    I used a 1/2" radius round over bit for the front side of the door frames. This is a personal option and you can use any number of different router bits for the design you want.

    Sand and apply stain and finish before installing the screen and the molding.
    Cut the screen to fit 1/2" inside the door frame and staple in place all the way around.
    Miter cut the molding's to perfectly fit the inside frame of the door.
    Pre-drill and countersink the screw holes in the molding.
    Screw the molding over the edges of the screen.
    Install the spring, handle and latch and you should now have a beautiful screen door that should last for many years.

     
    We hope you liked this project. If you build it and your friends ask where you got such a clever idea, please tell them that you got it at www.RunnerDuck.com.

     
    If any of you have wood projects to share I would be happy to put it into a format for our newsletter. Just send me an email at kennyb@runnerduck.com and lets see what we can come up with. Thank you!
    Free Rockler Catalog
    Get a Free Rockler Woodworking Catalog by clicking on the link below


         If you want to talk about something just drop us a line to kennyb@runnerduck.com any time, we like to talk about most anything. We are always looking for content for our newsletter so if you have something to add we'd love to publish it, assuming it meets our strict family oriented requirements!

    All rights reserved, RunnerDuck Productions,
    2000, 2001, 2002, 2003, 2004, 2005, 2006, 2007,2008
    RunnerDuck and its logos are property of
    RunnerDuck Productions.
    All other logos are property of the individual companies.
    We can be contacted at kennyb@runnerduck.com.

    Past RunnerDuck Review Newsletters

    RunnerDuck Productions | P.O. Box 871 | Coupeville | WA | 98239