Patriotic DuckThe All American RunnerDuck Review
August 1, 2009
 Welcome Back

Wow it is been HOT! We are into a record setting period of heat that we really are not enjoying. The temperatures in the Seattle area have broken 100 degrees F this past week and Thursday it broke the all time record of 103 degrees F. Here on the island where the temperature is usually ten degrees cooler it's been in the mid 90's! This is no fun for us old folks ;-) The good news is that the natural air conditioner has returned for Coupeville. The wind comes into the Straits of Juan de Fuca from the Pacific Ocean and cools us off.
 
We did get to go crabbing this past weekend but were skunked. We got two really nice size crabs but they were both female's and we had to throw them back.
 
Thank you for all the nice emails regarding our new grand-daughter. We enjoyed all your emails and if we didn't get back to you we're sorry. For all of you that asked, Jenni and Emerson are doing just fine. By the way Emerson is a girl! If any of you are interested you can follow Emerson's growth at http://jenmatty.blogspot.com.

Here's a picture of her trying to enjoy the summer heat!

There is a lot going on around the island this month. Coupeville will host the annual art festival this weekend which is always a good time. Here's a link to the entire goings on this coming weekend, www.coupevilleartsandcraftsfestival.org.

Ken and Marilyn


Join Our Mailing List!
Wood'n Wares Hand Made Wooden Utensils

Wood'n Wares

Summer is a great time for picnics an having a nice looking table is important. These wonderful, Wood'n Ware hand crafted, hard maple kitchen tools are something that will make your table look great. Not only do they look nice but they last a lifetime. Check out the large selection by clicking on the display below. www.runnerduck.com/woodnwares.htm.
In This Issue
What's New
Site of the Month
Marilyn's Corner
The Tempos Big Band
Joke of the Month
This Months Recipe
Woodworking Project
Free Rockler Catalog
Please Donate
 
 
Wood Plans
Woodworking Tools
Rockler Specials
Rockler always has great specials, here's the latest! 

What's New?
While we were out boating this past weekend we saw a wonderful way for people to exercise. The Dragon Club has this twenty person boat that they take out to get some exercise.
 

 It looks like a great time and they appear to be having a lot of fun. They row out of the Oak Harbor Marina and work up a pretty good sweat.

Site Of The Month
Have you visited Bing yet? That's Microsoft's new web search engine. It looks nice and appears to work well. It does bring up some different results than Google and seems to work just as fast. When you are trying to search for something on the web I'd suggest giving it a try or better yet try both Bing and Google and see if you get more results.

Just go to www.bing.com and start searching.
Marilyn's Corner
Tin Pockets
Tin art is always a fun thing to do. You do have to be careful so you don't cut yourself on the sharp edges. If you are a young person making this project we'd suggest getting some adult supervision to help make it. These pockets make great gifts and look really nice hanging around the house.


Here's what you'll need:
  • Tin panels. You can get them at most craft stores.
  • 4" X 4" stiff cardboard.
  • Colored wire about 24 gage.
  • Decorations for your project.
Cut the tin panel into fourths.
Using one fourth, place the cardboard kiddy corner as a folding guide.


Fold three of the corners up and over the cardboard.
Punch a hole in the middle, where the two corners come together, using a push pin.
Tie them together with a piece of wire.
You can also use these holes to run wire through when you tie your decorations on. We used sea shell beads.
We coiled some of the wire around a pencil to give it some nice curley Q's.
Punch a hole near the top and run a wire through the hole to make a hanger. Loop the wire and wrap it around its self several times to make a solid hanger.
You can put all kinds of things in your pockets to make them very pretty.

Use the extra material to make more and give them away as presents.

If you have a craft project that you'd like to share with our readers just send it to marilyn@runnerduck.com.

The Tempos Big Swing Band
The Tempos only have one summer concert left on their schedule. If you are going to be in the Seattle area on the following date come check us out.
  • The Ballard Locks, August 16, 2:00 - 4:00, Ballard Locks
If you have an event planned in the Seattle area and in need of a great band The Tempos are ready to perform for you. Just drop a line to kennyb@runnerduck.com

The Tempos

The Tempos CD, "Big Swing", features fourteen great swing songs from the 40's and 50's. If you love the old big band swing music we think you'll enjoy this CD. It's the kind of music that makes you just want to get up and dance, you do remember how to swing don't you?

The only place you can get this CD is from our web site. Go to www.thetempos.com and click on the "Click Here" at the top of the web page or click the album cover.


CLICK HERE
.

If you'd like to get a taste of this CD just go to The Tempos web site. When you are at the Tempos web site click on the horn valve button that says "Hear our CD". Then click on the song titles to hear a little bit of each song.

The Tempos big swing band is available for hire. If you have a special event that could use the wonderful music of a classic sixteen piece big band be sure to contact kennyb@runnerduck.com. We perform all over the Seattle area for all sorts of events.

Joke of the Month
This was sent to us from Robert I. kid stories are always fun!
 
Kids Are Quick
 
TEACHER:   Maria, go to the map and find North America.
MARIA:       Here it is.
TEACHER:  Correct. Now class, who discovered America?
CLASS:        Maria.
____________________________________
  
TEACHER:  John, why are you doing your math multiplication on the floor? 
JOHN:         You told me to do it without using tables.
__________________________________________
 
TEACHER:  Glenn, how do you spell 'crocodile?'
GLENN:      K-R-O-K-O-D-I-A-L'
TEACHER:  No, that's wrong
GLENN:      Maybe it is wrong, but you asked me how I spell it.
____________________________________________
 
TEACHER:  Donald, what is the chemical formula for water?
DONALD:    H I J K L M N O.
TEACHER:  What are you talking about?
DONALD:    Yesterday you said it's H to O.
___ _______________________________
 
TEACHER:  Winnie, name one important thing we have today that we didn't have ten years ago.
WINNIE:    Me!
__________________________________________

TEACHER:  Glen, why do you always get so dirty?
GLEN:        Well, I'm a lot closer to the ground than you are.
_______________________________________
 
TEACHER:   George Washington not only chopped down his father's cherry tree, but also admitted it.  Now, Louie, do you know why his father didn't punish him?
LOUIS:     Because George still had the axe in his hand.   
______________________________________
    
TEACHER:  Now, Simon, tell me frankly, do you say prayers before eating?
SIMON:     No sir, I don't have to, my Mom is a good cook.
______________________________
    
TEACHER:  Clyde, your composition on 'My Dog' is exactly the same as your brother's. Did you copy his?
CLYDE:      No, sir.  It's the same dog.
___________________________________
 
TEACHER:     Harold, what do you call a person who keeps on talking when people are no longer interested?
HAROLD:       A teacher

If you've got a funny family friendly joke send it to kennyb@runnerduck.com


This Month's Free Recipe
 
Strawberry Ice Cream Prafait Pie 
 
Here's a great summer recipe from the late Helen Barns in North Bend, Nebraska. This is a great dessert for any summer dinner.
  • 1 Package Lemmon Jell-O
  • 1 1/4 Cup Boiling Water (can use juice from berries)
  • 1 Pint Strawberry Ice Cream
  • 1 1/2 Cup Sliced Strawberries, drained and slightly sweetened
  • Baked Pie Shell 
Dissolve the Jell-O in Hot Water.
Add Ice Cream by spoonfuls, stirring until blended.
Allow to chill until it starts to set but not firm, about 1/2 hour.
Stir in drained Strawberries.
Put in Pie Shell and chill. Another simple but delicious recipe from the past.

If you have a recipe you'd like to share with our readers please send it to marilyn@runnerduck.com. We'd love to share it with everyone.

Woodworking Project
 

WOOD PROJECT PLANS

DOWNLOADABLE & MAIL-DIRECT
WOODWORKING PLANS
Download WOOD Store® woodworking plans directly to your computer and start building in just minutes! OR, we'll mail them to you, your choice!


CLICK!

This Months Woodworking Project

Pull Out Spice Racks


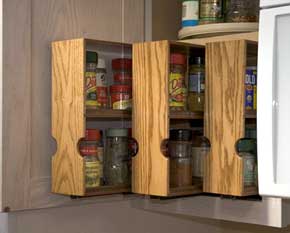
We had always kept our spices on a two tier lazy susan which made getting spice bottles out of the middle difficult. I knew there had to be a better way and went to work. I came up with a three pullout spice rack that has a shelf in the middle giving you two shelves on each pullout. I made the fronts out of oak, the tops, bottoms, shelves and backs out of plywood and edged the shelves with walnut. I think they turned out pretty neat.

I measured the cabinet opening to determine the width and height. Since our cupboard doors close flat to the front of the cupboard frame I measured from the back to the face.
I left a 1/4" space between each rack and also for clearance to the sides of the cupboard.
For top to bottom I left 1/8" at the top and took into account the thickness of the slides.
Once I had my dimensions I cut out the fronts from 1/4" oak.
I drilled notches for finger holes using a 1" forstner bit. To do this I used my drill fence and a scrap piece of wood butted up tight against my fronts.

7-Pc. Forstner Bit Set

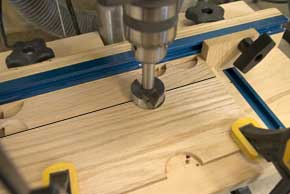
I cut the backs from 1/4" plywood to the same dimensions as the fronts.
I used 3/16" plywood for the tops, bottoms and shelves. I cut the top and bottom dado's for each on my tablesaw.
To get the correct width I put my shelf against the tablesaw fence and with another piece along side my shelf I set the fence so the saw blade just touched.

I ran the top and bottom edges along the fence and then moved them out a little and ran them through again to finish the dado. I CAREFULLY move the board back and forth against the fence to square up the dado.
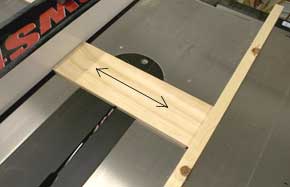
I used the same trick for the center dado but I used a second fence in the form of a piece of scrap wood wedged into the other track on my table saw. The difference between the fences is the width of my dado. I do not recommend doing this unless you are very careful and know what you are doing. Also, NEVER do this with deeper dado's, these dado's are only 1/8" deep.
Make a first cut using one fence then make a second cut using the other fence. Run the piece through a third time moving it SQUARELY back and forth between the two fences.

Here's a picture of the dado without moving it back and forth and after I've gone back and forth.

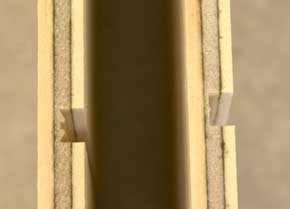
Here's what the back of the front looks like with dado's. The back pieces should look the same less the finger cutouts.

After all the dado's are cut glue and clamp the racks together.

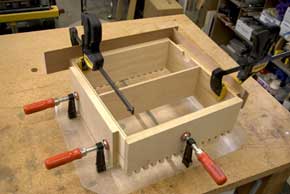
I made my own square clamp to help square up everything while it was gluing. You can also get a plastic one from Rockler that works well.

Clamp-It® Assembly Square and Clamps (Sold Separately)

I made the shelf edges out of walnut. I cut them 1/4" wide, 3/8" hight and the length of the shelves. I used a roundover bit to soften the top outside edges.

Rockler 3-Pc. Roundover/Beading Bit Set

I glued each edge to the top-sides of each shelf.

I like using the Quick Grip clamps, they are very handy on a project like this.

Irwin® Quick-Grip® SL300 Clamps

After the glue dries sand and finish the wood to suit your taste.

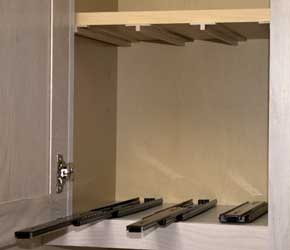
Installing the shelf required some extra work. First I had to install a spacer in the bottom of the cabinet to get the drawer slides up high enough to clear the front lip. I used some Formica for this.

I used over travel slides for the bottom of the racks and I wish I had used just full extension slides. With the over travel slides the racks come out beyond the cupboard and there is no support for the top out there.
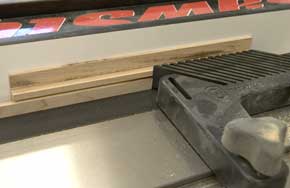
Speaking of guiding the tops, I ended up making a spacer/guide to place between the racks and on the two sides of the side racks.

I cut them on my tablesaw using magnetic featherboard to help guide them.


Magswitch Magnetic Table Saw Featherboards

Once I had the tracks cut I screwed them onto the bottom of the shelf above.

Since the slides are screwed to the bottom of the rack I had to shorten the screw so that it would not come through. I carefully used my grinding wheel to shorten them up.

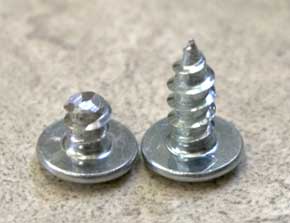
First I screwed a good screw in until it was just about through the other side of the wood. Then I backed it out and put in the shortened screw.
I applied a two part epoxy between the slide and the rack then screwed them on.

After they were cured Marilyn filled them up and they worked perfectly in our kitchen. That's about it for this month. We hope you liked this project. If you build it and your friends ask where you got such a clever idea, please tell them that you got it at RunnerDuck.com.

If any of you have wood projects to share I would be happy to put it into a format for our newsletter. Just send me an email at kennyb@runnerduck.com and lets see what we can come up with. Thank you!
Free Rockler Catalog
Get a Free Rockler Woodworking Catalog by clicking on the link below


     If you want to talk about something just drop us a line to kennyb@runnerduck.com any time, we like to talk about most anything. We are always looking for content for our newsletter so if you have something to add we'd love to publish it, assuming it meets our strict family oriented requirements!

All rights reserved, RunnerDuck Productions,
2000, 2001, 2002, 2003, 2004, 2005, 2006, 2007,2008, 2009
RunnerDuck and its logos are property of
RunnerDuck Productions.
All other logos are property of the individual companies.
We can be contacted at kennyb@runnerduck.com.

Past RunnerDuck Review Newsletters