

For more great plans click on the banner below.
|
|
 Bathroom Cabinet
We have a small master bathroom and needed some more storage space. The logical place ended up being above the toilet. Rather then just bolting a cabinet to the wall I wanted a little more style and this standing cabinet seemed to fit the bill just perfectly.
We'll start with the legs for the stand. They are made from 5/4" straight grain fir. I glued two 6" X 96" X 5/4" pieces together, first rolling the glue on both pieces of wood.
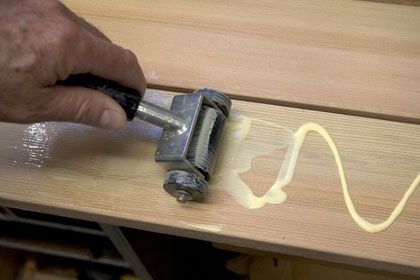 I like Titebond glue but you have to work quickly if you use Type II.
 Titebond® II Premium Wood Glue
 NOTE: You could cut the boards in half before you glue, it works either way. Next I cut the boards in half and then cut them down to 2" X 2".
 I used my Freud Glue Line Rip blade because it produces nice clean edges that require little sanding. I also use it because I don't have a jointer.
 Freud® LM74R Glue Line Rip Blade
Now cut the legs to length. Mine are 38" long because we are going to put in a "comfort height" toilet. If you are making this for a standard toilet you'll probably want to make them a little shorter.
 To cut them to the exact length I clamped a board to my tablesaw 38" away from the blade and it stops just before the wood enters the blade, this prevents any possible binding and kick-back. Using the taper jig I made in my April 9, 2004 newsletter, www.runnerduck.com/04-09-04.htm, I tapered the last 8 3/4" of each leg down to 1 1/2" square.

 Round the edges of the legs using a 3/8" roundover bit in your router. Next I cut the cross pieces and end pieces out of clear 3/4" pine. The top front, top back and leg spreader are all 22 1/4" X 2 1/2". The four end pieces are 6 1/2" X 2 1/2".

Now we'll cut the mortise and tenon's. I start with the cross pieces and then the legs, this allows me to precisely align the location of the mortise.
 Set the fence 3/4" from the blade and cut all four sides of all seven pieces.

I used the same technique for cutting these as I did for the length of the legs. Set a stop just short of the saw blade and use your miter for the wood.
 Heavy-Duty Tenoning Jig
Carefully lay out the marks for the mortise. I offset the cross pieces to within 1/8" of the leg faces, this makes for a nice reveal at the joint. I aligned the top cross pieces flush to the top. The lower side pieces are 7" up from the bottom and the back piece is 10 3/4" up from the bottom.
 16-Pc. Forstner Bit Set
 I used the drill press table I made, www.runnerduck.com/drill_press_table.htm, to make each mortise exactly the same.
 Set the stop block to register the top end.
 Using a sharp chisel clean out the mortise and square the ends. Cut a curved detail in the front cross support. I used a French curve to lay out the lines.


Cut out the detail using a scroll saw or band saw. Now it's time to glue it all together. Apply glue to the tenon's and inside of the mortise's. Clamp the stand using cauls under each clamp.

Next we will build the cabinet that mounts to the stand. I made the cabinet out of clear pine and 1/4" plywood. We'll begin by cutting the sides 9" X 38" X 3/4".
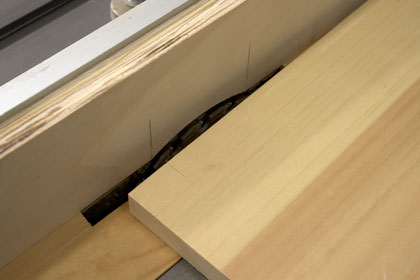
 The shelf will be 5 3/4" from the bottom. Set a stop on the miter fence and cut the dado's all the way through.
 I cut them all the way through because I'm going to paint my cabinet and they won't show. If you are going to use a stain finish you may want to stop short of the front and chisel out the dado. The sides are held to the top and bottom by biscuit joints. Lay out for three biscuits on each end marking both sides at the same time.
 Cut in the biscuits on the top and bottom of both sides.
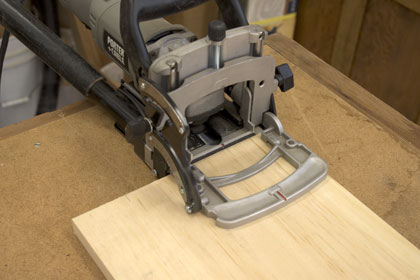
 Porter-Cable Deluxe Biscuit Joiner, Model No. 557
The back of the cabinet will be 1/4" plywood so we need to dado in the backs of the sides to recess the back.
 Use a chisel to complete the dado cut, squaring the ends.
 I used my shelving jig to drill the holes for the shelf holes.

 JIG IT® Shelving Jig
Cut the shelf that fits in the dado's 8 7/8" X 24 1/4".
 Roundover/Beading Bit Set
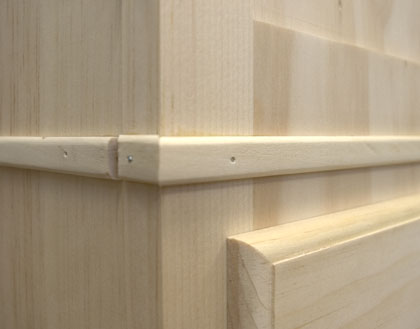
Add a crown molding around the top front and sides. There is a large selection of different styles available at most home supply stores.


Use pipe clamps with cauls. Measure from corner to corner to make sure that it is square, then let the glue dry overnight.
Now it's time to make the doors. I decided to use lap joints for the corners. I was after an old fashion look and square corner joints seemed to fit the ticket. Each door will be 30" X 12 1/2" and made from 3/4" clear pine and plywood.

I used a stop on my miter fence to make repeatability easy.

Notice that I stopped just short of the end of each piece. This saved me from having to chisel out each corner.
 Work quickly so the glue does not dry and clamp each corner.

Be sure to check the squareness of each door by measuring from corner to corner. The dimension should be the same.  Non-Mortise Hinges
Even though they are non-mortise hinges I decided to inset them a little. I used my plunge router and clamped a piece of wood on each side for stability and routed a mortise on the cabinet side.

 Porter-Cable 893PK Router Package

While I didn't get any good photos of the next few steps they are pretty straight forward. 
I cut a 1/4" piece of plywood to fit exactly between the rails of the doors approximately 7" high.
 Glue and nail the trim strips with finish nails. Apply your finish of choice to the cabinet and it's ready to mount to the base. Drill holes for the pulls that go on the cabinet doors and fake drawer fronts. A little trick I like to use is a sticky note to lay out the lines for drilling.
 I used figure eight fasteners to hole the cabinet to the base.
 Desk Top Fasteners
Drill countersink holes with a Forestner bit so the figure eight fastener is flush to the top.
 Screw in the figure eight fasteners with flat head screws.
 Set the cabinet on top of the base and screw up through the figure eight fasteners. Cut and paint some shelves to fit inside the cabinet and you are good to go.
 Since this cabinet has a small base it should be attached to the wall for stability. That's about it. We hope you liked this project. If you build it and your friends ask where you got such a clever idea, please tell them that you got it at RunnerDuck.com. |
|
The AllAmerican RunnerDuck Review Visit our Blog, www.runnerduckreview.wordpress.com, and sign up to receive notifications when it is updated. Our newsletter is a monthly blog with woodworking projects, crafts, recipes, and more. When you get to our blog just enter your email address and click "Sign Me Up". This is what it looks like:

|