|
It's time to add a little more retro to my Cruiser. I've been looking at a lot of different sunvisor's and finally settled on the E&G Classics from Race and Street. Maggie at Race and Street was very patient with me asking all my questions and helped a lot with my selection. Installation was pretty easy but I always have to hold my breath when I'm drilling holes in my baby ;-)
 Kit as received The kit was complete with screws, double back tap, the visor, center cover, trim strip and instructions. I later found out that I was short two screws because I drilled three holes in each side to match the holes in the visor. The instructions only show two screws going into the sides. I suppose you could just use two screws but I opted for three. Maggie's painter did a very nice job on the paint. They applied two coats of color and two coats of clear, nice. One of the mounting tabs on the side was bent from shipping but I easily straightened it out. The instructions say to paint the underside with flat or satin finish black paint. I guess a lot of people don't bother but I'm king of anal about things like that and painted mine with satin black. Before I painted it I decided to clean up the melted flashing from where they heat-staked the two pieces together.

I used a Dremel tool to remove the flashing.
 Be careful not to remove too much or you'll defeat the heat welding. After I removed the flash I sanded the area with some 400 grit sandpaper. Since you barely see this area you don't have to do a great job of sanding. I suppose if someone was really picky they could fill the holes before sanding.
 Mask around the edges. You only need to mask around the edges and protect the topside from over spray. You only need to spray the front three quarters of the bottom side, the back quarter will not show when installed.
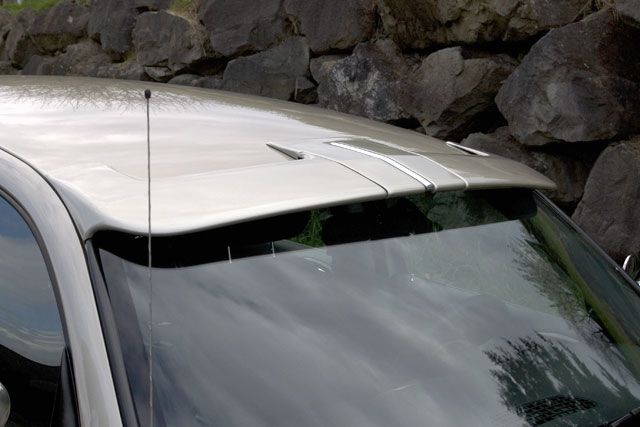
 Here is the finished underside of the visor. The first step in installing the visor is to center it and make sure that it is 5" back from the rear edge of the windshield rubber moulding.
 I used a grease pencil to make the mark. Measure back 5" at several spots and then draw a straight line approximately the width of the center of the visor. This really helps in lining things up. Pull back the weather stripping in the areas where you will drill the side holes, just back of the windshield posts. I placed a couple of pieces of tape on the visor to hold it in place while I marked the holes on the side. Be sure and measure from the windshield to the front radius edge of the visor per the instructions. I has to be at least 1 5/8" so the windshield wipers will clear.
 I marked the sides with a grease pencil. Next I center punched the hole marks and drilled the holes.
 Hold the weather stripping away from the drill. I used a vacuum while drilling the holes to get all the metal shavings out of the holes and away from the weather strip. I found out that there are two layers of metal that you will need to drill through. The outer skin is pretty thin but there is a thicker piece inside. I used the recommended 7/64" (.1094") and then tried to install the screws, they would not screw into the inner holes. I ended up using a .136" bit and it worked just fine. Your experience may vary and I'd use what E&G recommends if you can. After you've drilled the holes I installed the visor using two screws to temporarily hold it while I drill the center roof holes.  Don't torque the screws at this time, snug is good. While I had the visor in place I put the center cover on. I discovered that it didn't fit all that great.
 After I drilled the eight screws holes using the 7/64" drill bit recommended in the instructions I put the center cover in place and the trim strip. I drilled the hole for the trim strip. Remove the visor and cleaned up all the drill shavings. A vacuum works best for this. I used my Dremel tool again to make some adjustments to the center piece to make it fit better. It didn't take much and everything fit perfectly. Apply a good silicone sealer all around and in the holes on the roof and sides.
 Don't be shy using the silicone, you really don't want anything to leak! Before you install the visor put some double backed tape on the corners.
 I ended up adding two pieces of tape in the corners because it would touch the roof. If you've ever worked with automotive double backed tape you know that once it sticks you play hell removing it again. Have someone help you and hold the back corners up until you have the front screws started then lay it on down. Install all the side screws and then the eight center ones. Apply double backed tape to the center piece per the instructions and put it in place. Again be careful because that tape really does stick! I did not like the brushed aluminum piece that came with the visor. It just didn't match the rest of the chrome on my car. Instead of installing it I counter sunk the hole in the back center of the cover and installed the supplied flat head screw. Then I cut a piece of plastic chrome that I had left over from one of my previous additions to fit the center grove of the cover.
 I like it a lot better for the look of my car. There's nothing wrong with the brushed aluminum I just like the bright stuff better. That's it for this edition, stay tuned for more :-)
BACK
|
|
The AllAmerican RunnerDuck Review Visit our Blog, www.runnerduckreview.wordpress.com, and sign up to receive notifications when it is updated. Our newsletter is a monthly blog with woodworking projects, crafts, recipes, and more. When you get to our blog just enter your email address and click "Sign Me Up". This is what it looks like:

|

