

|
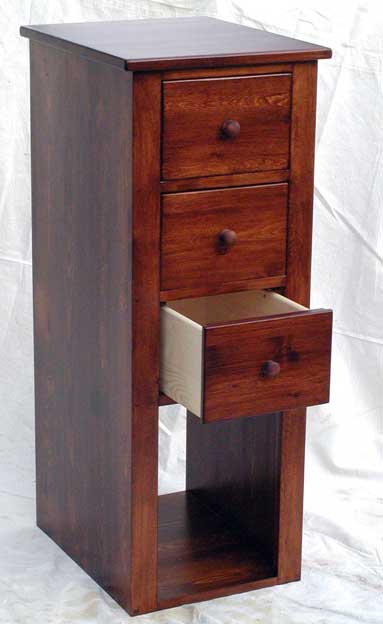 The design features of this DVD Cabinet are three drawers to hold DVD's and a large open space in the bottom to hold the subwoofer of our sound system. This was my first endeavor into making a piece of furniture. There was a lot more to it than I first thought. I copied from existing pieces of furniture that we have so that it would match. The biggest challenge was matching the stain. All in all I'm pretty pleased with the way it turned out and I think you can make one too. Here's a list of materials you'll need to buy. The wood is finish sizes.
(4) 3/4" X 5 1/2" X 8' Wood of your choice, we used spruce. NOTE: I discovered after I had completed this project that some of the newer cardboard DVD's are wider than the plastic ones. Because of this the drawers will not close with them standing on edge. Boy I hate it when that happens! The dimensions below are for the plastic ones. If you want it to fit everything I'd suggest measuring every DVD case you can get your hands on.
The first thing I did was started gluing up all the pieces. I don't have a planer so use a Freud Glue Line Rip Blade to true all the edges. It worked really great.
Cut all the pieces so that when they are glued together they are wider and longer than the finished part. We will finish cutting them after they are glued up. I alternated 6" and 4" boards for the glue ups.
 After the glue has cured sand the surfaces to make them flat. The best choice for this would be a drum sander but I don't have one in my tiny shop. I used a belt sander to flatten the surface. Don't use too aggressive of sandpaper or you might remove too much material. If you have some ridges between pieces run the belt sander at an angle while moving it straight back and forth with the grain.
 By the way I just got this new Porter Cable belt sander and I'm loving it. It's loud so you will need to wear ear protection but other than that it runs really true and I like the variable speed.
Here are the final dimensions after your glue up has cured.
For the cabinet:
I made a frame and put plywood in the middle of the frame. This gives it good rigidity and a nice finished look.
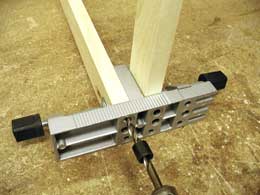
I made the frames from 2" X 3/4" pieces on the sides, 1 3/4" pieces on the back and front.  The plywood is 3/16" X 14 3/16" X 8 5/8". I dadoed a 3/16" X 3/16" groove around the four pieces to hold the plywood. I placed the groove 1/4" down from the top edge. To add strength to the frame I use two dowel pins in each corner. I found this neat Dowel Pro Jig at Rockler that help perfectly align them.
I clamped this jig onto the side of the front or back piece and the ends of the side pieces.
Using the supplied depth guide on my drill bit I drilled two holes in each corner.  Cut two notches in the front of the drawer spacers and the bottom as shown above. Be sure to use a piece of backing wood so you don't rip out the edges when you cut them.
DRAWER ASSEMBLY --->click here |


|
For Email Marketing you can trust
|
|
NOTE: Entering your email address does nothing more than add you to the list for our newsletter and future updates. When you click on GO you will be taken to a screen where you complete your registration. Thank You |