

|
 Marilyn thought it would be nice to have a little folding table for when we are camping. A place to sit our frosty mochas when we wind down from the days activities. Not only did the table need to fold up but it also need to be light. I think this simple design accomplished both.
Here's what you'll need:
 (Click)
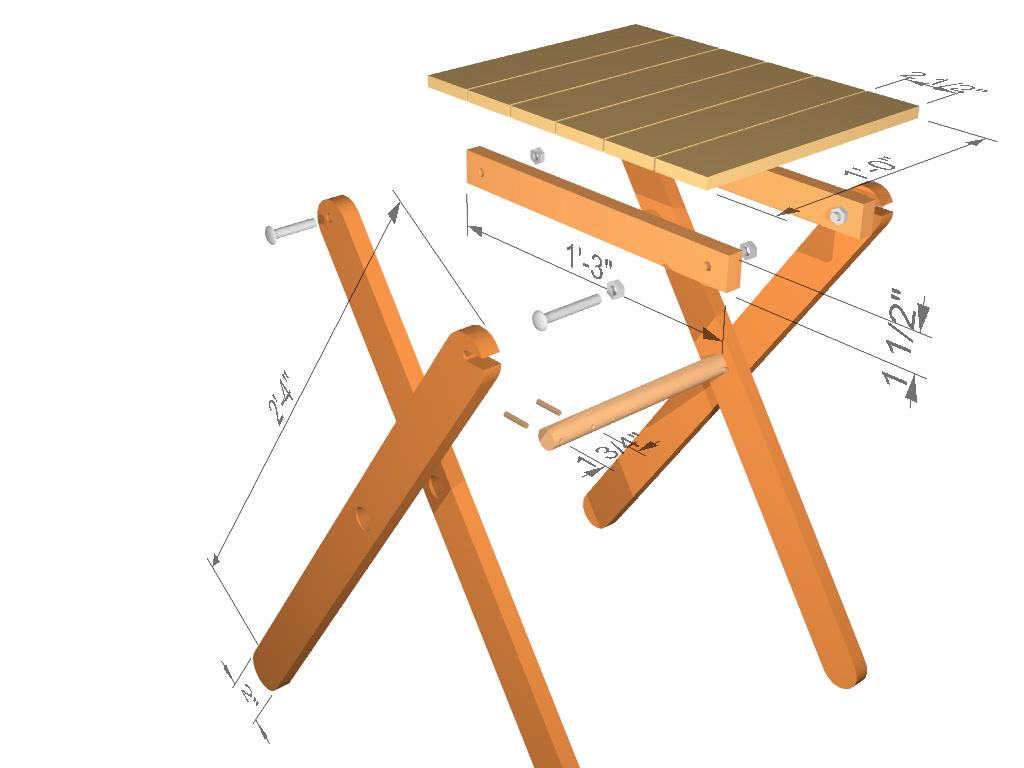
I used Poplar on this project to keep the weight down. You can use any type of wood you like. We also made ours out of 1/2" and 1/4" wood again for weight. You could use 3/4" and 1/2" to make it a little more stable.   On one set of legs drill a 1/4" hole centered on the radius for one end. Counter sink a 3/8" hole for the head of the Carriage bolt. On the other set of legs cut a notch using this pattern.  (CLICK) It's easiest if you drill a 3/4" hole and then cut the slot. Cut two table supports 1 1/2" X 15" X 1/2". Drill a 1/4" hole in each end. On one end of each piece drill the hole 1" in and 3/4" down. On the other end drill the holes 1" down and 1" in. Cut six top pieces 2 1/2" X 12" X 1/4". Depending on the exact length of our piece of wood you may have to adjust the length of the top pieces to account for the saw cut width. Lay out the top pieces with a 1/4" space between each piece. Align and glue the table supports centered 1 1/4" in from the edges with the offset hole farthest away from the top.  Cut the 1" dowel 12 1/4" long. Cut four 3/16" dowel pieces 1 1/2" long. Assemble the non notched legs to the table support on the end with the hole 1" X 1" using the 1 1/2" bolts. Put the dowel through the leg holes and peg them with the 3/16" dowels. Install the 2" Carriage bolts using a nut, washer, table support, washer and nut. Space the head of the bolt just far enough away from the table support to capture and hold the notch in the legs. Snug up all the nuts but not too tight. The tighter you make them the more stable the table will be but the harder it will be to fold it up. Now go find an easy chair, set your new table up next to it and enjoy your favorite beverage. We hope you've enjoyed this project and have good success with it. Remember, if you ever have any problems with our projects just drop us a line and we'll try to help. Since we build every one of these projects we have a pretty good idea of how to get through them. We also make lots of mistakes so we can help avoid them. |
|
The AllAmerican RunnerDuck Review Visit our Blog, www.runnerduckreview.wordpress.com, and sign up to receive notifications when it is updated. Our newsletter is a monthly blog with woodworking projects, crafts, recipes, and more. When you get to our blog just enter your email address and click "Sign Me Up". This is what it looks like:

|