

For more great plans click on the banner below.
|
|
 Well once again I ran out of time on this project and didn't quite get the finish for the newsletter but at least you get a good idea of what it looks like. This is another one of those projects that will change depending on what size your pictures are, what type of molding you choose to use and other factors. I'll just show you how I made mine and you can go from there. Picture shelves are a cool way to display pictures as opposed to hanging them on the wall. It makes it easy to rearrange the pictures when you want a different look. Here's what you'll need:
Molding, your choice of style There are a number of different ways to make a picture shelf. I started with one idea and sort of adjusted it as I went. I'm still not completly crazy about the ends but it works OK. To get an idea of how it would look and how things would fit together I made a mockup of the shelf only about 10" long. It really helped work out some of the issues.

Start out by cutting the top and back of the shelf. My top is 43" X 3 1/2" and the back is 43" X 3 3/4".
 Cut a piece of 2" X 4" X 12" to make the supports. I marked the end of a 2" X 4", 2 13/16" on the bottom and 1 13/16" on top. I drew a line between the two points. Using a T-Bevel Sliding Square, I aligned it with the marks. Using the T-Bevel as a guide I set the table saw blade to that angle.
I cut the 2" X 4" at the angle lengthwise.
Cut this piece into three 4" lengths.

Cut the bottom front piece using the same angle as the supports, 44" X 1/2" X 2 3/8" width from point to point.

Cut the molding 44" long.  Align the pattern to the edge of a 1/2" piece of oak. I used my tablesaw fence to align the flat edges. I also had not allowed for the edge that will go around the top of the shelf so I added 3/4" above the pattern.
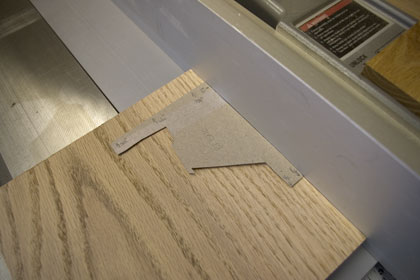 I very carefully cut out the end pieces on my jig saw. Notice that I placed X's all the way around the cut line on the side that I want to cut so I don't get confused.

Carefully fit the ends onto the shelf and make any adjustments that may be requried.

Cut the top front piece (lip) to fit the end pieces height by 44" long.

I use Irwin Quick Grips and Bessey Bar Clamps. All that's left is routing the holes for mounting. I was going to use a French Cleat to mount it but I didn't have the right router bit in my stock. I decided to use a Keyhole router bit instead.
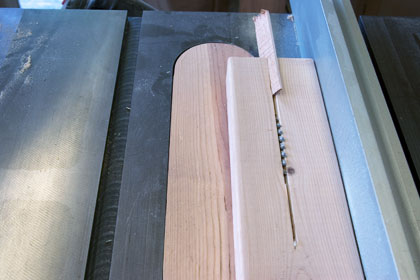
It turned out that this was not an easy task, especially on my router table (table saw). It took some cretive fixturing to get the slots set to the right location and length. Here's a picture of the set up for the center keyhole. I had to do a different set up for each hole.

Route the slots on the back of the shelf, install screws in the studs of the wall and hang the shelf.
That's about it. We hope you liked this project. If you build it and your friends ask where you got such a clever idea, please tell them that you got it at RunnerDuck.com.
|


|
The AllAmerican RunnerDuck Review Visit our Blog, www.runnerduckreview.wordpress.com, and sign up to receive notifications when it is updated. Our newsletter is a monthly blog with woodworking projects, crafts, recipes, and more. When you get to our blog just enter your email address and click "Sign Me Up". This is what it looks like:

|