

For more great plans click on the banner below.
|
|
Here's another neat project sent to us by Bob B. from Glen Rose, Texas about 60 miles south west of Fort Worth. Bob made a couple of different versions of this table and liked this one the best. They are very stable and heavy so they do not tip over easily, even with rambunctious kids around.
Here's what you'll need:
This will make the wood slightly smaller than the 5 1/2" we show below but it all works out.
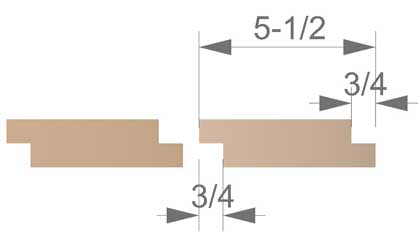
Bob chose to use this Shiplap joint but you could also use a tongue and groove joint, splined joint or biscuit joint.
Now cut the table top into a 30" circle. Bob made a jig to use his band saw. It was a large table addition to the saw with a pin located 30" away from the blade. A small hole in the bottom of the table went into the pin and you rotate the table through the blade. You can also use a saber saw following a line drawn using a string or stick secured in the middle of the bottom. Round over the edges of the top using a 3/8" roundover router bit.
The base of the table is made by cutting four 2" X 2" X 12".
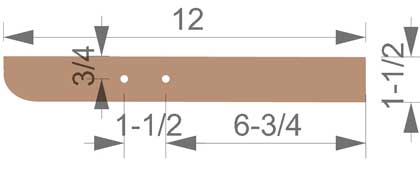
Drill 3/8" diameter holes 1/2" deep and drill the centers on through for the #6 deck screws. We'll plug these holes later.

Pre-drill and countersink the screw holes.
 Here's a bottom view of the finished table.
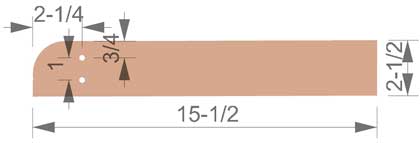
Next we'll make the legs.
On the wide end of the leg measure back 3/4" on one edge and cut the angle as shown above, this will give you approximately 15 degrees.
The base for the legs is made the same as the bottom of the table.
Round over one end with a band saw or saber saw.
 It should now look something like this. Plug the holes with 3/8" dowels or make your own plugs using these nifty Taper Plug Cutters.
All that's left is a good sanding and finish. A good exterior stain and varnish will look really good on this table. Some people like to let cedar just turn gray over time. Either way this table will really look great on your deck. Thanks Bob for sharing another great project with the RunnerDuck readers. That's about it. We hope you liked this project. If you build it and your friends ask where you got such a clever idea, please tell them that you got it at RunnerDuck.com.
|


|
The AllAmerican RunnerDuck Review Visit our Blog, www.runnerduckreview.wordpress.com, and sign up to receive notifications when it is updated. Our newsletter is a monthly blog with woodworking projects, crafts, recipes, and more. When you get to our blog just enter your email address and click "Sign Me Up". This is what it looks like:

|