

For more great plans click on the banner below.
|
|
There are no dimensions for this project because if you tackle something like this it will be different than this one. Hopefully the ideas we have will inspire you to take on your own project. Here's what we started with:
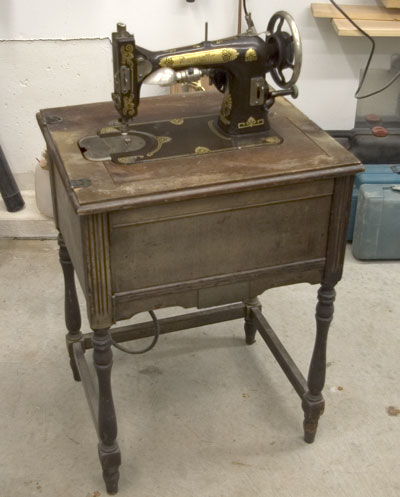 Notice that the top that usually folds out to extend the table is missing.
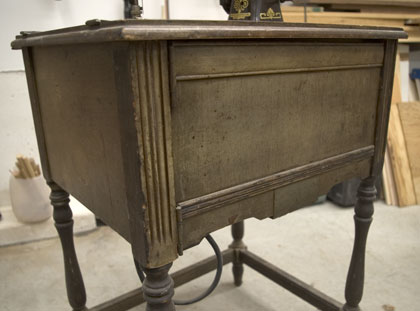 Here's a close up of the cabinet so you can see the condition.
 There was a lot of stuff behind the front door that needed to be removed.
 One of legs had apparently attacked a dog who immediately took revenge against it. Here's what the finished product looks like;

The first thing I tackled was adding a rail across the bottom front of the legs to match the other rails. I wanted to add a shelf to the bottom and this rail was needed.
 I transferred that information onto my rail.
 I cut the tenons on my tablesaw and then transferred that dimension directly to the leg for the mortise.
 I marked the depth of the tenon on a drill bit with a piece of tape.
 Then I drilled holes in the leg where I had marked.
 Next I chiseled the mortise square to match the tenon.

 Ah, perfect fit!
Next I gutted it and made room for a large drawer. I decided to reuse the hinges and door catch so I saved the parts in a marked bag, that way I wouldn't loose them.
 To get the final drawer width I installed the slides.

I made the drawer using dado joints in the back. For the front I stacked two pieces of wood making the inside one match the back of the drawer and just glued and nailed to the sides.
 I glued and clamped it all up and it was good to go, after a little varnish.

Ah, perfect fit! Next I cut, glued and nailed a couple of small supports at the bottom of the rails to support the new shelf.

Once that had dried I cut a piece of 1/2" plywood to fit inside the base on the runners.
 After it cured I used a wood rasp and sandpaper to get it back to it's original shape, sans chew marks.
Next came the top which I made from 1/2" plywood and some pine that I had lying around. I decided to put a 1/2" decorative edge around the plywood to hide the plywood edges.
 Next I used my router to cut a matching tongue in the edges.
 The edges were placed into the top to mark the miters.
 The miters were cut and the edges were glued into the top and clamped.

After the edges were dry I routed a decorative edge all the way around.
 Desk Top Fasteners
Drill countersink holes with a Forestner bit so the figure eight fastener is flush to the top.
 Screw in the figure eight fasteners with flat head screws.

After a good sanding I applied about three coats of paint and put it all together. It's fun to make something new out of what would have otherwise gone to the dump. I hope you can find something like this to work on for yourself.
That's about it. We hope you liked this project. If you build it and your friends ask where you got such a clever idea, please tell them that you got it at RunnerDuck.com.
That's about it. We hope you liked this project. If you build it and your friends ask where you got such a clever idea, please tell them that you got it at RunnerDuck.com.
|


|
The AllAmerican RunnerDuck Review Visit our Blog, www.runnerduckreview.wordpress.com, and sign up to receive notifications when it is updated. Our newsletter is a monthly blog with woodworking projects, crafts, recipes, and more. When you get to our blog just enter your email address and click "Sign Me Up". This is what it looks like:

|