

For more great plans click on the banner below.
|
|
This project started when we got a sundial and needed a place to put it. I came up with this design when I was watching the Fraiser TV show. They had a piece of furniture in the living room that looked like it would work great for our sundial. I broke out my CAD program and started designing. We're really pleased with the way it turned out.
Here's what you'll need:
 Freud® LU74R Thin Kerf Ultimate Crosscut Blade Set it at 84 degrees. I used my new Wixey Digital Angle Gauge.
 Cut the four sides to length, 23 3/8". Cut each end and flip the board between cuts so looking from the side you'd have a parallelogram. Mark the outside, inside, top and bottom of each side. This will really help prevent any mistakes later on when cutting the sides (speaking from experience :-).  Measure 23 3/8"
Measure the ends from the center out to get 7 9/16" on one end and 2 11/16" on the other. I really find the Incra Centering Ruler to be helpful.

Mark the 45 degree lines on the ends of one of the sides. You'll use this to set up your taper sled.
 Freud® LM74R Glue Line Rip Blade Set the blade to 45 degrees.
 Set up the Taper Sled that we made in our May newsletter, www.runnerduck.com/05/05/07.htm, to cut the taper on the sides. The tricky part is aligning the cut marks in the taper sled. Here are four pictures of what I did.
 On the end closest to you I used a small ruler to align the cut in the sled with the mark on the side.
Next we'll make the corner pieces. I used 3/4" walnut cut 1 1/2" X 26".
 After I split the piece I ran it through my planer to get it to 1/4" think.
 Cut the corners to the final length of 23 9/16" and 81.7 degrees. I used my Wixey Digital Angle Gauge to set the tablesaw miter to 81.7 degrees.
 I got sort of tricky with my biscuit joiner.
 Porter-Cable Deluxe Biscuit Joiner, Model No. 557 I evenly spaced four biscuits along each edge. I made a witness stick to mark each of the sides. I transfered the marks from the sides onto each of the corners. I marked the corners to match each side, A, B, C and D.
 Set the biscuit joiner to "S" to cut the corners. This will make for a larger hole. Set up a sacrificial board to cut into. This will help keep the joiner perpendicular to the small corner board.

Readjust the joiner to "O" to cut the sides. This will make for a smaller hole for the biscuit to sit in. You want the biscuit to sit high enough to go through the corner board and into the other side. You may need to adjust the stop pin on the joiner.

It's very difficult to dry fit everything since the biscuits will fall out.

Repeat this with each corner until all four corners are in place.

Cut the top from 11" X 11" X 3/4" wood.

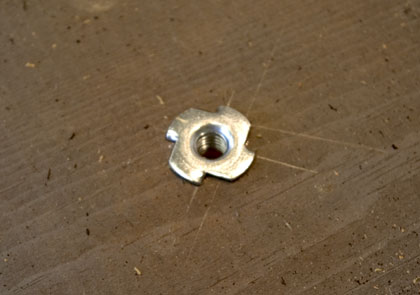
Drill a 3/8" hole centered in the bottom and counter bore the bottom to house the washer and nut.
 Glue and install a threaded insert.
Measure the distance from the bottom of the inside of the threaded insert to just shy of the bottom of the bottom. Cut the threaded rod to this length.
Fill the stand about 2/3's full of styrofoam peanuts, fill the rest of the stand with small rocks. That's about it. We hope you liked this project. If you build it and your friends ask where you got such a clever idea, please tell them that you got it at RunnerDuck.com.
|


|
The AllAmerican RunnerDuck Review Visit our Blog, www.runnerduckreview.wordpress.com, and sign up to receive notifications when it is updated. Our newsletter is a monthly blog with woodworking projects, crafts, recipes, and more. When you get to our blog just enter your email address and click "Sign Me Up". This is what it looks like:

|