

For more great plans click on the banner below.
|

Our garden has been harvested and now we need a place to put the fruits of our labor. Potatoes and onions needed a nice place to stay fresh until we eat them. I came up this this three compartment vegetable bin and it works great. I'm giving more of a photo and description of this project as opposed to detailed plans. I think you'll be able to make one by looking through what I have.
A couple of comments about this project:
Materials:
 Hold the two sides together with double backed tape. Make sure that the sides are aligned with each other.
 Cut the stair steps on a band saw or hand saw.

Smooth and square up the edges with a cabinet scraper and sandpaper.
 Now lay out the dado areas. Remember all angles are 45 or 90 degrees and the plywood is 1/2".
 Cut the edge dado's using a straight router bit and a fence.
 Square up the corners using a chisel.
 For the inside dado's I used a palm router and ran it against a clamped piece of wood. I had to make two passes to get the width right.
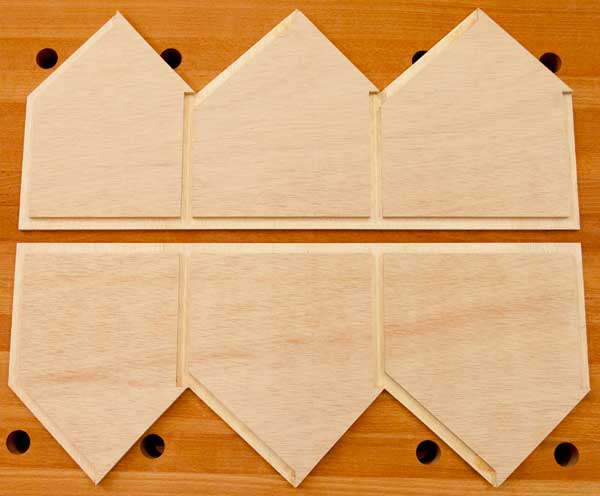
 Repeat this on both sides. You should now have pieces that look like this.
 Square up all the corners with a chisel.

Now turn your attention to the fronts and bottoms.
 Cut the top and bottom 23 1/2" long and wide enough to fit. Dado the back edges halfway through and as wide as the plywood so the back will sit inside.
Before I made the doors and back I decided to put what I had together to get more accurate measurements.
Mask the edges that will get glued so that they stick better when assembled.
Glue, nail and clamp the box together.
Now cut out the back and match it to the box. Mark the location for the dado's across the middle. Cut the dado's.
Measure and cut the pieces for the doors. The top door will be a little wider than the others.
Glue and clamp the doors together.
Set the tablesaw blade to 45 degrees and cut the doors to fit.
Now cut out the notches for the hinges in both the doors and the cabinet.
Once the doors fit perfectly take the hinges off and paint all the remaining pieces.
Assemble the back to the box.
Cut out screen to fit over the windows of the doors. cut it about 1" oversize overall.
Screw the frame over the screen onto the doors.
Drill holes and install knobs in the middle top of the doors.
Now fill it up with the veggies from your garden and enjoy!
We hope you liked this project. If you build it and your friends ask where you got such a clever idea, please tell them that you got it at RunnerDuck.com.
|


|
The AllAmerican RunnerDuck Review Visit our Blog, www.runnerduckreview.wordpress.com, and sign up to receive notifications when it is updated. Our newsletter is a monthly blog with woodworking projects, crafts, recipes, and more. When you get to our blog just enter your email address and click "Sign Me Up". This is what it looks like:

|