

|
 It seems like space is always a problem when planting a garden. Well how about going vertical? This nifty strawberry planter does just that. This project requires a compound miter saw because of some of the compound angles you'll have to cut.
Here's what you'll need:
Cut a 45 degree point on top. Cut four center pieces of 1" X 4" 18 3/8" long. Cut four outside base pieces of 1" X 4" 26 1/2" long with a 45 degree bevel on each end. Cut four supports 34 3/4" long with one end at 32 degrees and the other at 58 degrees. Attach the four center pieces to the center post using two screws each. One from the top and one from the bottom. Use a pipe clamp to center and hold the center piece to the center post while you drill and screw. Drill and counter sink all holes to keep the wood from splitting and burying the heads.
 Attach the four outside base pieces to the center pieces using two screws in each end. Pre drill and counter sink each hole. It should look something like this.
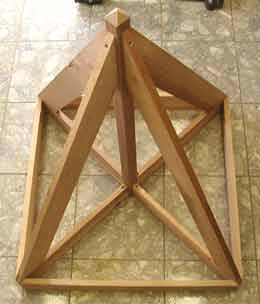
 Now attach the supports using one screw in each end. The bottom should look like this.
 The top should look like this.
 This is what your strawberry planter tree should look like at this point.
 Depending on how accurate you were at making your cuts and assembly last week, will have a lot to do with how well the shelves will fit. You will need a compound miter saw to make these cuts.
First we need to mark each leg for the location of the shelves. The first mark is 5" up from the corner. Make four more marks 4 1/8" apart from the first mark. You should now have five marks.  That should pretty much rap up this project. Just fill it up with dirt, plant your strawberries, sit back and watch them grow. Everyone will wonder where you got such a cleaver idea. Be sure and tell them that it came from RunnerDuck :-) We hope you've enjoyed this project and have good success with it. Remember, if you ever have any problems with our projects just drop us a line and we'll try to help. Since we build every one of these projects we have a pretty good idea of how to get through them. We also make lots of mistakes so we can help you avoid them. For a great selection of woodworking supplies and tools check out Rockler, Great Prices/Great Selection! |
|
The AllAmerican RunnerDuck Review Visit our Blog, www.runnerduckreview.wordpress.com, and sign up to receive notifications when it is updated. Our newsletter is a monthly blog with woodworking projects, crafts, recipes, and more. When you get to our blog just enter your email address and click "Sign Me Up". This is what it looks like:

|