
For more great plans click on the banner below.
|
|
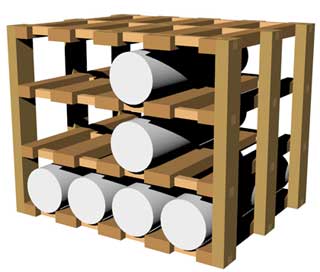
I had been looking for plans to make a wine rack but couldn't find exactly what I was looking for so decided to design my own. I wanted something that was functional yet had a nice appearance to it. I came up this this walnut and maple crisscross design. I hope you like it and take the time to make yourself one.
 The design was done in Rhinoceros CAD software. I've already made a mockup out of plywood and now it's time to make the real deal. Because of the way I designed it precise cutting is very critical to a successful project. I used zero clearance tablesaw inserts which me made in November's newsletter, www.runnerduck.com/table_saw_insert/insert.htm. I also used really good saw blades. My favorite for precision ripping is the Glueline Rip from Freud:
And for crosscutting I like the Freud Crosscut Blade:
 Once you cut the Vertical Supports keep them matched by marking them with a piece of chalk. This will prevent them from getting mixed up later on. Set up the dado blade for 1/2". It isn't actually 1/2" so I cut a scrap piece and measured it.
 I like to use calipers to take accurate measurements. I currently use dial calipers but would really like to get a pair of digital fractional ones. Next I took the Maple and ran it through the planer until it got the same thickness as the dado.
 I used a scrap piece of Walnut that I ran through the dado to make sure that the Maple fit in the groove.
 I also ran the Walnut through the planer to make sure that each piece was the same 3/4" thickness. I wanted the Maple supports to be exactly square so I set up my table saw width using the planed Maple boards.

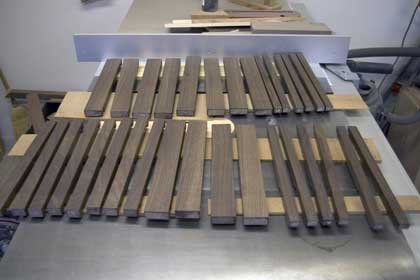
Cut the Maple boards to 15 3/4"" long and then cut them into 1/2" square strips. Cut all the Walnut pieces per the cut list on Step 1. You should now have a pile of pieces that look like this. 
Using a zero clearance insert in your tablesaw, set up the dado. Using scrap pieces get the depth exactly the thickness of the Maple pieces. Precision is the key to making this project look nice. Set up the tablesaw miter with a stop and dado the shelf pieces. The dado should start 1/2" in from each end and then one more in the middle. 
Setting up to cut the vertical pieces is a little tougher. Set the dado to half the height so the two pieces together just fit the Maple pieces. The top and bottom of all the pieces will be dadoed so that the Maple pieces are flush to the top and bottom of the sides. The top middle shelf dados need to be 4 1/4" down from the top and the bottom middle shelf needs to be 3 15/16" down from the top of the previous dado. You should now have all the parts cut and ready to assemble. They should look like this.  Sand all the Walnut pieces since it will be really difficult to sand them when the wine rack is put together. Do not sand the inside edges of the vertical supports since they will have to be flush when bonded. 
I put the vertical supports flush together and sanded the outside and inside edges. After all the Walnut pieces were sanded I stained them with Danish Walnut. Do not get any stain in the groves or on the mating surfaces of the vertical supports. 
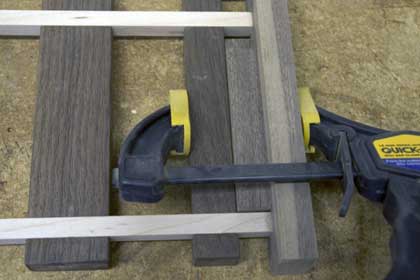
Now we need to start gluing the pieces together. Clamp spacers to the outside of the small shelf pieces to align the Maple pieces. 
Carefully apply glue to each of the groves. Don't use too much glue and keep it off of the stained pieces. 
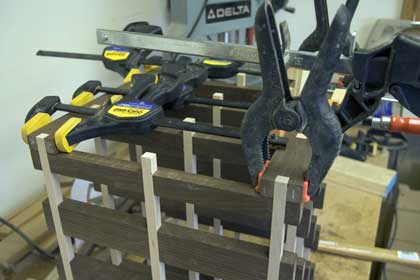
The glueup should look something like this. 
If your sawing was very precise then it might take some tapping to persuade the Maple pieces into place.  Now you need to glue the whole thing together. You will need plenty of clamps to keep everything square and in place while drying.

If you don't have enough clamps Rockler always has a good selection to choose from.
   Irwin® Quick-Grip® 6'' Mini Bar Clamp Irwin Quick-Grip® XP Bar Clamp Flex-Jaw Spring Clamp Set
Once all the pieces are in place and dry apply your favorite finish. I just used paste wax on this wine rack. That's about it. We hope you liked this project. If you build it and your friends ask where you got such a clever idea, please tell them that you got it at RunnerDuck.com.
|
|
The AllAmerican RunnerDuck Review Visit our Blog, www.runnerduckreview.wordpress.com, and sign up to receive notifications when it is updated. Our newsletter is a monthly blog with woodworking projects, crafts, recipes, and more. When you get to our blog just enter your email address and click "Sign Me Up". This is what it looks like:

|


